
|
CELEBRATE! You did it! First you wrote a novel, then you put in the hard work to edit it. That is one hell of an achievement! You should be proud of yourself and you should celebrate. If you didn't celebrate with some personal reward when you finished your first draft, you should definitely do that now. Your reward can be anything that signifies to you, "I did it and I earned this reward." It might be a long soak in a bubble bath with a glass of your favorite beverage, the purchase of a new journal (to start plotting your next book), a night on the town, or a week-end get-away. It should be something that is within your means and which will be your incentive for the next part of the process (Querying? Beta readers? Self-Publication?) or get you moving on the next story. Whatever it is, go do it! G O C E L E B R A T E!! When You're Done Celebrating... After you have had a moment to celebrate, you will want to get back on track with completing your journey. If your plan was "just to see if I could write a book," then you may be able to consider your job done. But if you want to take the next steps, you have a little more work to do. Whether you choose to publish independently, or try to find an agent to publish traditionally, you will want to do at least two things: 1) Write a blurb. 2) Find some beta readers. Remember Your Original Blurb from Day 2? The blurb we wrote on Day 2 was done in order to get focus on the essence of our story. It was not meant to be used at a later date as the book jacket or back cover blurb, nor as the query you would use to submit your book to an agent. It was a good exercise to start with because it helped us focus on the big picture rather than all those words and details which can feel overwhelming when we suddenly realize we've written a novel (YOU REALLY DID IT!). It got us in motion and put us in a mind-set of "I'm now editing." It took the edge off, so to speak. If you plan to self-publish, you will want to write a blurb for you back cover. If you are not quite sure how to write it, do an internet search for "back cover blurb." It might also be worthwhile to include your genre when you do the search. What you'll soon discover is that there is no perfect formula. You may find some guidelines, but no specific formula. I like the post by Author Unlimited (https://authorunlimited.com/blog/back-cover-blurb) which breaks down the elements you should consider including, elements like:
Reedsy has a good post as well (https://blog.reedsy.com/write-blurb-novel/). In the Reedsy post, you will find information about using keywords and examples from some pretty famous authors like Diana Gabaldon, Lee Childs, and Paula Hawkins. Find Beta Readers and/or Critique Partners Beta readers are people who will read your book and, hopefully, give you some critical feedback about your story. They are usually not your first readers. Your first readers are what I like to call cheerleaders. Your cheerleaders are going to be those people you trust with your words, who aren't ultra-critical, and who cheer you on. They are your family or friends who want to read your book because they want to cheer you on. They want to see you succeed. If you don't have those people in your life, for whatever reason, then you might skip on to beta readers. Beta readers don't have to be professionals, but you should look for someone who has a critical eye for reading. There are beta exchange resources where you can give a critique to receive a critique, and there are also sites where you can put out a request by providing your genre, the title of your book, and a blurb. The Write Life has a post listing 40 places to find a critique partner and I strongly recommend reviewing it (https://thewritelife.com/find-a-critique-partner/). Most of the sites listed are free. It's important to keep in mind that many of them are expecting critiques in return. Since you may find yourself on the other side and needing to provide a critique, you might want to review Victory Crain's post, How to Critique Fiction, which has some general guidelines (like, "Critique as you would want to be critiqued.") and a series of questions you can work through to provide good feedback to an author. C.S. Lakin has a nice checklist as well (https://www.critiquemymanuscript.com/checklist-for-critiquing-a-novel/). Professional Editing Services After you get feedback on your story, you may discover that you need to use a professional editing service. Before you settle on an editor, make sure you understand the different types of editing services. See the post on PenUltimate Editorial Services for a breakdown on the many types of editing (http://penultimateword.com/editing/types-of-editing-defined/). One type of editing that I'm noticing is not on a lot of the sites is a sensitivity read, but maybe this is because it's not truly a form of editing. A sensitivity reader is someone with extensive personal experience or a member of a niche community that is represented in your story. The reader will provide feedback regarding any potential bias, stereotypes, misrepresentation, or racism. Once you've figured out what type of editing you need to have done, review The Write Life's post about how to pick an editor (https://thewritelife.com/how-to-find-an-editor-crucial-questions/). That post could save you time, money, and frustration that could arise from taking a misstep. Self-Publishing? Format Your Book If you have weighed the options between publishing independently or traditionally, and have come to the conclusion that self-publishing is the best fit for you, you will want to spend a little time researching on which platform you'd like to publish. The Smashword's founder, Mark Coker has published a guide on the Smashword's publishing platform (https://www.smashwords.com/books/view/52) that will guide you through the process of manually formatting your manuscript and I've found that the guide works across all the platforms, including Amazon. If you have written in Word, Amazon has a tool for formatting your book with styles with a few clicks of the mouse. I wrote a review of the tool on my blog when the tool first came out. Check it out! (https://authorrichellerenae.weebly.com/random-musings/kindle-create-made-an-add-in-for-word-documents) The other option is to pay for a formatter. See what Creative Penn has to say about formatting on her site. (https://www.thecreativepenn.com/formatting/) Publishing Traditionally? Find an Agent If you want to publish traditionally, you will want to write a query to send to agents. If you have already spoken to an agent who is eager to read your work, you will still want to provide a well-written query. If you have no idea how to find an agent, your first steps might be talking to other writers or researching lists that are available online. QueryTracker (https://querytracker.net/) and Publisher's Marketplace (https://querytracker.net/) are two popular websites that maintain lists of agents, agencies, and publishers. Both sites offer easy search features that allow you to filter for agents within specific genres and maintain stats on agent success. For a small annual fee, you can track all the queries you send and the responses you receive on QueryTracker. It's important that you visit the agent's website or find their manuscript wish list so you are submitting to an agent who is hoping to discover a book like yours. Agents also close their Inboxes to submissions for a variety of reasons, so you want to be sure you are querying to agents who are open to queries when you are ready to send yours. You will also want to pay close attention to what each agent wants in a query. Sometimes they want pages and other times they only want a query. Sending them items they do not specifically request is a great way to have your request immediately tossed in the trash. Write a Query Once you find some prospective agents, you will want to spend some time writing a query. In some respects, writing a query is even harder than writing a blurb because you are trying to write something that appeals to someone whom you know about next to nothing. The good thing is, agents are typically looking for some fairly tried and true information that is rather formulaic. While you are certainly not required to write to the formula, if you've never written a query before, research and understand the formula and then write what you think works best for your novel. Read NY Book Editors' post for a good formula for writing an effective query with examples (https://nybookeditors.com/2015/12/how-to-write-a-darn-good-query-letter/). Another great site to check out is QueryShark (https://queryshark.blogspot.com/). QueryShark is run by literary agent Janet Reid. She receives submissions for query reviews and then posts her remarks. It's incredibly informative to read through all (yes ALL!) of the posts and see how she's criticized or complimented the authors' submissions. Once you've read the posts and taken a shot at writing your own, you can even submit it to see how you did OR how you can make it better. 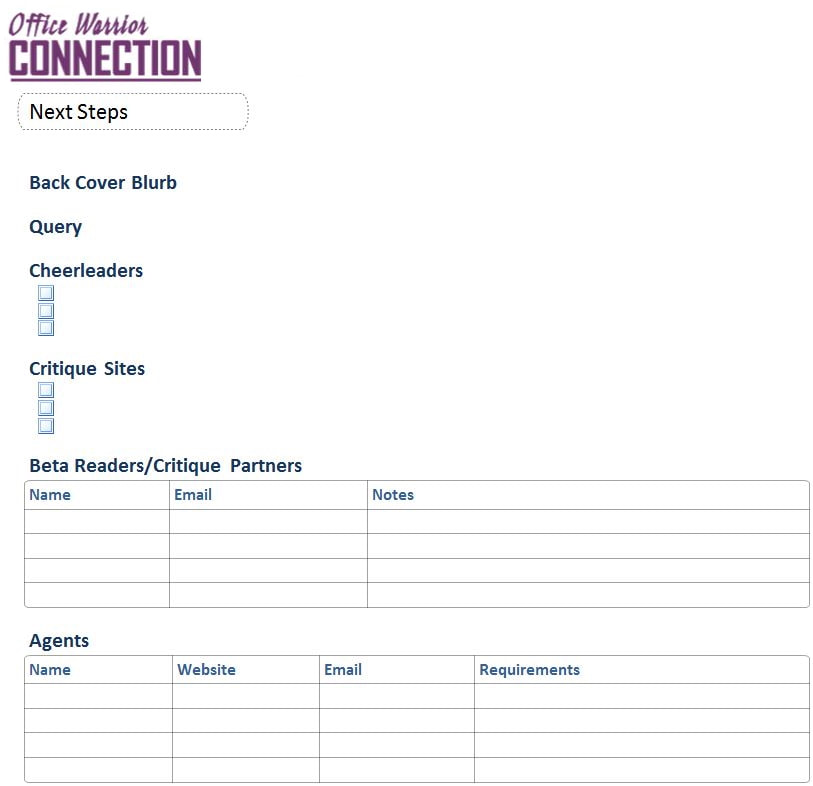 Exercise: Next Steps Lists
Your exercise for Day 30 is research, research, research. Research the next steps you want to take and make your plan of attack. I've put several lists together into one page in Microsoft OneNote, but you might want to create individual pages for each item.
Back Cover Blurb - text Query - text Cheerleaders - checklist Critique Sites - checklist Beta Readers/Critique Partners - table columns: Name | Email | Notes Agents - table columns: Name | Website | Email | Requirements DOWNLOAD: Character Attributes Worksheet Template Instructions Return to the Table of Contents 5/28/2019 Day 28 - Crutch and Filter WordsThe Importance of Word Choice On Day 12, we talked about Chapter Pacing and made sure each chapter flowed into the next, but pacing is also affected by the length of words, sentences, and paragraphs. Longer or more difficult or unusual words and sentences force a reader to slow down. The brain shifts from reading to deciphering. Deciphering might be fine at the beginning of a story when we are world building and introducing characters, but we don't want to slow down readers who are cruising along imagining the big fight scene at the climactic ending of the story. Crutch words, due to their repetitive nature, and filter words, which are often extraneous, can also pull a reader out of the scene. Therefore, whenever possible, you may want to actively try to eliminate them. What are Crutch Words? Crutch words are those certain words, phrases, emotions, characteristics, etc. that we unwittingly overuse when we write. We all have our own personal Crutch words that we lean on (Get it? Lean on? Crutch words?) or tend toward using while we are writing. I find that when I'm doing sprints to get as many words on the page as I can in a short amount of time, my crutch words come out in droves. A good editor will spot those for you, but as you re-read your work, you may begin to spot them on your own. Two of mine are “giggle” and "sigh." I've also found that my characters roll their eyes a lot. In my current work in progress, my main character Elizabeth Aguera giggles a lot, but what is interesting about that is, if I had to describe my character, she would not be a character who giggles. She's a detective who lost a young daughter in an accident and who investigates murdered or missing girls during her annual vacation. She's a serious, thoughtful person. She doesn't giggle. Yet, when I search for the word "giggle" in my novel, Detective Aguera seems to always be on the inside of a joke. In works that I've edited for other authors, I've found, "for the first time ever” or “best ever” used multiple times throughout the stories. In fact, adverbs are often culprits when it comes to overused crutch words. Knowing this, you should keep an eye out for these words: basically, practically, almost, especially. What are Filter Words Filter words are similar to crutch words in that they are extraneous and often not needed to support the narrative of a story. They are often a sign of telling rather than showing (see Day 20 for more information about Showing vs Telling), and they prevent the reader from really experiencing the story from their personal point of view. Instead, they are viewing the story through the character's point of view. Adverbs may be filter words or crutch words, as are weak verbs and nouns that lack specificity or allow confusion when a sentence is read. Adverbs can be found by searching your manuscript for "ly." While not all adverbs end in -ly, it's a good way to eliminate a big share of them. Weak verbs include words like get or got and almost always have a stronger counterpart verb that can replace them. Nouns that lack specificity include stuff, thing, and that. These also usually have stronger words that can be used. In Day 27, we looked at Voice and Tense and discussed "-ing" words, but if you didn't get a chance to complete the exercise for that day, you should also search for "ing" to check and see if there are stronger options than the word being used. I've included it in the instructions below, just in case. 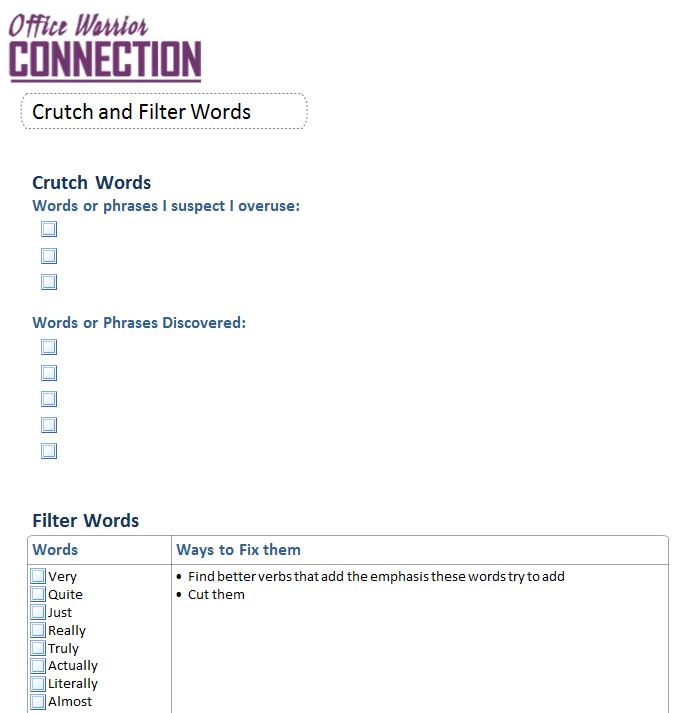 Exercise 1: Find and Eliminate Your Personal Crutch Words and Phrases
Steps for using WordCounter.net
Exercise 2: Eliminate your Filter Words and Phrases
Crutch Words Checklist
More Resources See Anne Allen and Kathy Steinemann's post about filter words and phrases for even more detail about this topic, along with 80 alternative words and phrases that can help you unravel how to make the corrections. https://annerallen.com/2017/06/filter-words-and-phrases-to-avoid-in-writing/ Take a look at Diana Urban's post where you can find 43 words similar to the ones I have provided to catch even more filter words. https://dianaurban.com/words-you-should-cut-from-your-writing-immediately TIP for Microsoft Word users: Use Search and Replace with highlighting for all the filter words, then read back through your story again. You can use different colors of highlighting to mark different types of crutch words. See my Highlighter post for details. DOWNLOAD: Filter and Crutch Words Worksheet Template Instructions Return to the Table of Contents Go to Day 29 - Final Touches 5/26/2019 Day 26 - Dialog TagsWhat are Dialog Tags? Dialog tags are the "he said/she said" (and all the myriad variations) portion of dialog. The tags provide the attribution of dialog to whomever is speaking. They may occur before, after, or in the middle of speech. What Are the Rules for "Proper" Tagging? I'm going to take a page out of "The Chicago Manual of Style" (CMOS) to talk about the proper construction of dialog tags. However, be aware that what is considered acceptable in writing styles can shift over time. What's proper today doesn't always equate to what is acceptable or what is preferred. Therefore, what I state about dialog tags may not be the most popular stance you find depending on who is presenting the information, what industry they work in, and what year it is. Also worth noting is that I'm writing in the US and there may be stylistic differences for other countries. The key is consistency. If you use a style that is acceptable as opposed to proper, be sure to be consistent in your usage. Even CMOS will say "always" and "never" have no place in this discussion because there are rare exceptions to all kinds of rules. In general, follow the basic rules outlined below, and if there is some compelling reason to break the rule, just be consistent and break it in every instance. So without further ado, here are the CMOS rules for tagging dialog.
Okay, there's no real thing called "emotion tagging." It's just a phrase I came up with for when I'm editing. Emotion tagging is when you use an emotion instead of "said" in your dialog tag or when you use an adverb to modify the verb "said" (or its many synonyms). In my humble opinion, you cannot "emote" a sentence out of your mouth. Just try laughing and talking at the same time. Try humming and talking at the same time. Try smiling and talking at the same time. Okay, maybe you can do that one. Maybe you can sob and talk at the same time too. But I vote to eliminate these type of tags. I say, let the emotion be it's own action. Consider this sentence: "I don't want to leave you," she cried. The question is whether or not she is "crying out" the sentence (which is perfectly acceptable), or whether she is actually crying. If she is crying with tears flowing down her face, why not let that be the action (or "showing" part) of the paragraph or scene. See Day 20 if you want a review of Show or Tell. [link] The sentence, if the character isn't actually "crying out" might be rewritten as: Tears slid down her cheeks. "I don't want you to leave." Technically, yes, both are acceptable. But the second one, depending on the context may have more impact because the emotion stands on it's own as an action. Consider using stronger writing by eliminating emotion tagging. Overuse/Under-use of Tagging How many ways can you say "said?" Stated, mimicked, railed. There are literally hundreds of words that can replace the word said in a dialog tag. We've already talked about eliminating the emotion words, but that will still leave a lot of synonyms for said. I see two opinions about using "said" in dialog tags right now. On one side, a group of people are saying don't use said over and over. Mix it up. Use those synonyms. On the other side, and perhaps a bit more popular, people are saying, just use "said." Said disappears from the page when the reader reads, and all those synonyms slow the reader down. I'm in the second camp. My feeling is that dialog tags should be invisible as much as possible. Therefore, you really only need them to clarify who is the speaker or when you want to express an emotion in the most concise was because you don't want to draw the reader out of an action sequence. In the first case, you can help make those saids disappear by not tagging every line of dialog. By only tagging when you absolutely need to, like in lengthy back and forth discussions, the rest of the saids disappear into the background. Just to keep everyone on the same page and understanding who is speaking, throw in the occasional "he said" or "she said." It also means you don't use the synonym for said unless you want to express a certain emotion in the quickest, most concise way because you don't want to interrupt the flow of dialog. If you use dialog tags with most of your dialog, you are probably over-tagging. If you can't jump right to a section of dialog and tell immediately who is speaking (either because there are no other clues in the dialog, or because too much back and forth has occurred and you've lost track), you are under-tagging. Order of Operation You thought that was a math term, didn't you? Ok, you're right, it is, but I also like to use the phrase when talking about dialog tags because there is a proper place for them when you find you need to use them. The order of operations in writing dialog tags only matters when you aren't using the basic "he said" or "she said." If you want the "he said" tag to be invisible to the reader, put it at the end of the tag. The order is more important when the dialog tag is an action. Does the person laugh, then say something? Or does the person say something, then laugh? Maybe it doesn't matter in some instances, but it will be important in many because it may say something about the person or the emotion they are experiencing based on the action they are performing. In some context, laughing after saying something can be used to disarm an offensive comment or to give a sense of, "I'm just kidding." Laughing before something can mean they are responding to something they saw as funny or outrageous. Laughter can also be used to demean or brush off a comment. The order of operation can be used to provide context in very concise writing. 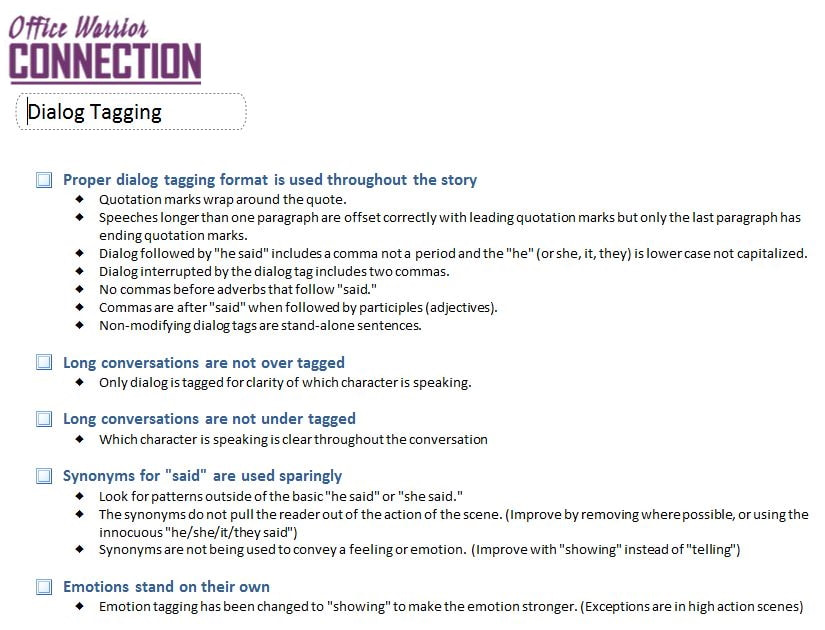 Exercise: Evaluate Your Method of Dialog Tagging
Dialog Tagging Checklist Proper dialog tagging format is used throughout the story
DOWNLOAD: Dialog Tagging Checklist Worksheet Template Instructions Return to the Table of Contents Go to Day 27 - Voice and Tense 5/25/2019 Day 25 - Climactic EndingWhat are the elements of a great climactic ending? A great climactic ending won't just be good winning over evil in a final heroic battle. A battle without an emotional element is just a battle. And a battle that doesn't stand out among many battles in a great war replete with battles is just another battle. The final battle should be the most important, most revealing scene in a novel. A climactic ending will have a whole series of events that lead the reader right up to the battle. It will be the highest point of tension in the story, the moment the main character has to do or die, and if the writer wants the reader to really love the book, the final solution cannot be a cliché or be out of the main character's wheelhouse. The writer will need to provide all the clues necessary throughout the rising action that the reader is not surprised by anything the main character does to win. For instance, if the main character has never been a cheater, cheating to win would not only be unexpected by the reader, but also out of character for the main character. It is often during these last chapters when the reader discovers what the main character has needed all along. They may have started out on the journey wanting to take down an evil empire, but discover that they had a deeply buried need to discover the father who was never around when they were a child. Sound familiar? 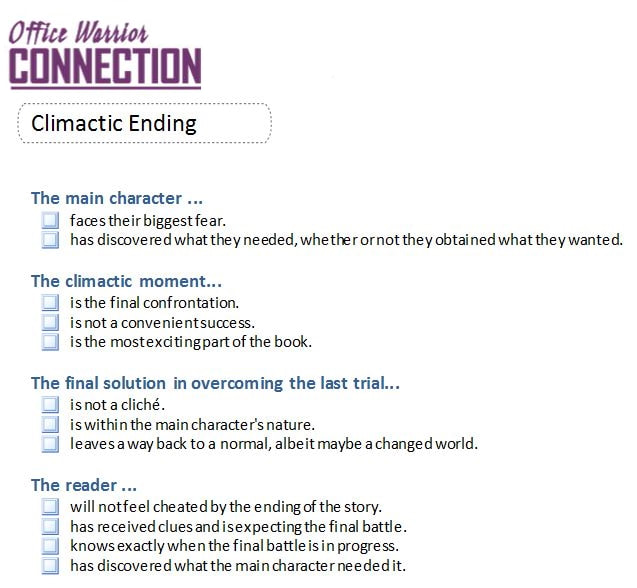 Exercise: Climactic Ending Checklist
Many of the items in the Climactic Ending checklist will have already been tackled by previous exercises, so this is an opportunity to review and make sure you haven't missed anything.
Climactic Ending Checklist The main character ...
DOWNLOAD: Climactic Ending Worksheet Template Instructions Return to the Table of Contents Go to Day 26 - Dialog Tags What is a lagging middle? A lagging middle is what sometime occurs after a main character has set out on their journey to find love, solve a mystery, or overcome the villain, but they haven't yet reached the final confrontation. If the story meanders along without an apparent goal in sight, or the trials become too repetitious without having an emotional effect on the main character, the writer risks the reader becoming disengaged from the story. Needless to say, stories need to move forward, gather momentum, and launch readers into the climax with fear in their hearts for the heroes. How do you tell if you have a lagging middle? Unfortunately there is no perfect method for discovering whether or our own stories have low points other than making sure you have a strong story structure. On Day 9 you mapped our story to the classic story arc and that should have revealed places where the story needed work to bring it in line with reader expectations. The best way to tell if you have a lagging middle is for someone to tell you that you do. This means you might not find out you have a lagging middle until you have someone read your story and provide in-depth feedback. At some point, you may be ready to have beta readers take your story for a spin. Listen closely to what they tell you. If they tell you they were bored at any point in the story, that is an opportunity to fix the lag. How do you fix a lagging middle? You've already looked at several ways to fix a lagging middle. On Day 11 you looked at making every scene in your story purposeful. This means you've already examined your scenes to confirm your story is moving forward. If you completed the Character Arc exercise from Day 15, you've also confirmed that your readers will care about your characters. You've even tested your momentum in the exercises covering Pacing from Day 12 and Tension from Day 13. The only other thing you can do at this point is focus on the breathers. What are breathers? Breathers are the space between tension in a novel. They are the physical or mental break we give our character as they transition from one challenge to the next as they make their way to achieving that thing they wanted in the beginning of a story. Breathers can be fast or slow, high or low. Depending on where you are within the story, your breather should be used as a method of setting the pace of the story but also of giving the reader "down" time after an emotionally charged scene. If you think of a highly dramatic movie, we are kept on the edge of our seats by the low build-up of oncoming drama as we are by the highly charged moments of an internal or external battle. This exercise is one more opportunity to focus in a bit tighter on pace to make sure you don't have a lagging middle, so focus on the middle 50% of you story. Yes, this is very subjective and yes you may have done this perfectly while writing without even thinking about it. Keep in mind this is just one more tool that you can use to perfect something that may already be very good or fix something that you initially thought was "just fine as it is."  Exercise: Review Breathers
Analysis of Breathers Does the breather have an obvious purpose?
DOWNLOAD: Breathers Worksheet Template Instructions Return to the Table of Contents Go to Day 25 - Climactic Ending 5/23/2019 Day 23 - First Sentence, First ParagraphThe First Sentence The first sentence of a story is an important but often overlooked element of a good book. A great first sentence will be remembered along with the characters and story itself. One of the most famous of first lines that I hear quoted by people is only a partial quote. "It was the best of times, it was the worst of times..." The rest of the quote from A Tale of Two Cities, by Dickins, seems to be lost in the number of words required to memorize the full quote. The other famous line I sometimes hear quoted is from a book that I would be surprised to discover the people quoting had ever read. "Call me Ishmael" is from Melville's classic, Moby Dick. My personal favorite is from a treasured childhood book by S.E. Hinton, The Outsiders. "When I stepped out into the bright sunlight, from the darkness of the movie house, I had only two things on my mind: Paul Newman, and a ride home." I'm not sure what struck me about that line, or whether it was because it both began and ended the story, but at the young age of twelve, I was hooked. The first sentence should name or at least reference the main character. If the story is in first person, "I" should be addressed. The second thing the first sentence should do is set the hook. It should be a powerful sentence that makes the reader ask a whole lot of questions. Why is the narrator saying to call him Ishmael? Is that not his real name? Why is a ride home on Ponyboy's mind? How did he get to the movie house? Why was he watching a movie in the middle of the day? The First Paragraph (or two) The first paragraph of The Outsiders goes on to make a comparison between the first person main character, Ponyboy and Paul Newman. It sets the stage by introducing us to a teen boy with usual teen boy angst and hints at the major theme of the story: the differences between the haves and the have-nots. I was hooked. Even though I was a teen girl, I was hooked hard by this boy wishing he looked like someone else but also not wanting to change because he knew he fit in where he was and would have to give up his beloved family and friends if he did change. Hooked. That is what the first line and first paragraph should do. They should hook the reader so hard that they stand in the bookstore with the book open in their hands unable to put it back on the shelf or even walk to the counter to pay for it. The first paragraph should start building a mood right away and add a bit of suspense and present the major theme in some way. One of the major themes in The Outsiders is rich vs poor and S.E. Hinton captures it perfectly right off the bat. Today's exercise includes a worksheet you can work on in order to confirm you have all (or at least most) of the elements that make up a good first sentence and first paragraph. If you're skeptical of the list, pull out your favorite novel and see how it's first sentence and paragraph or two stack up. 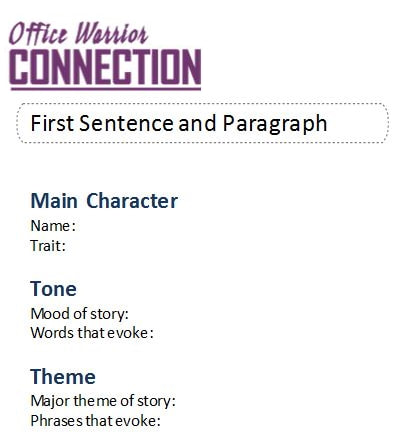 Exercise: Confirm a Great Beginning
Exercise Parameters Main Character: Who is your main character and what is their most obvious attribute or life philosophy that has an effect on the story? Fill in the name and the trait. Tone: What is the mood of your story? It doesn't have to last throughout the whole chapter or the whole act, but will help the reader settle in on what's to come if you can strike the right tone straight out of the gate. Write down the mood you believe your story struck. The best way to set tone in a single paragraph is by word choice. Think about what is the mood of your story, then do some word association to come up with words that fit the mood. Add your words to the worksheet. Try coming up with some synonyms as well. Once you have a couple words in hand, see if you can work them into the first paragraph. Theme: What is the message you want to convey with your story? Like tone, very early on we want to evoke a sense of what the story will be teaching our readers by the time they finish. Write down the major theme of your story. It may be hard to capture a theme in a single word, so instead, think about phrases that reflect the theme. Once you've gotten a list, see if you can work a phrase or idea that represents your theme into the first paragraph (or two). DOWNLOAD: First Sentence and Paragraph Checklist Template Instructions Tips for working by hand If you'd like to work on notepaper or set up the headings and parameters in your favorite application, include those listed above. If you are going to work by hand, give each parameter space for notes even if you plan to work down from the top because you may find as you start thinking that other ideas come to mind as you work. Return to the Table of Contents Go to Day 24 - Better Breathers to Eliminate a Lagging Middle 5/22/2019 Day 22 - First ChapterThe Importance of an Engaging First Chapter The first chapter is just as important as the first sentence and first paragraph since the first chapter is what will help a reader decide to keep reading or try something else. Within the first couple of chapters, you will introduce the reader to your main character, reveal the setting, set the time frame, and show the reader what every day life is like for the main character (all stuff I talked about in Day 9 when we mapped our chapter summary to a story arc). The first chapter won't engulf all those elements, but it should have some features that engage the reader and keep them reading. Today's exercise includes a checklist you can work from in order to confirm you have all (or at least most) of the elements that make up a good first chapter. If you're skeptical of the list, pull out your favorite novel and see how it's first chapter stacks up. 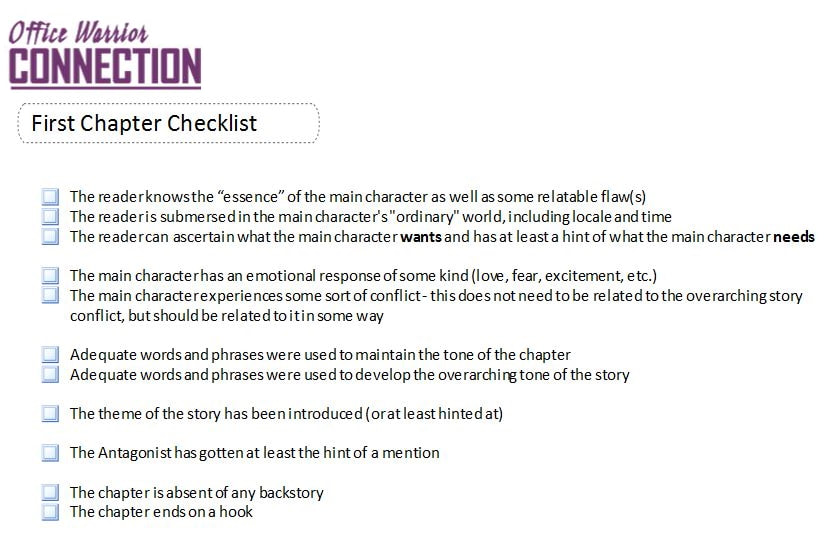 Exercise: First Chapter Checklist
First Chapter Checklist
DOWNLOAD: First Chapter Checklist Template Instructions Return to the Table of Contents Go to Day 23 - First Sentence, First Paragraph 5/21/2019 Day 21 - First ActThe First Act The first act of a novel is the first 20-25% of the story. The first act is an introduction to the main character and the purpose of the story. It should encapsulate all the answers related to the 5 W's: Who, Where, When, What, and Why, and it should do all of that before any of the real action begins. The reader should learn what everyday life is like for the main character and what they want that they can't obtain because of some lie that they believe. After you confirm you have all the elements of a good first act, you will start narrowing in on the first chapter, then the first paragraph and first sentence. Each level has its own set of key elements. Today's exercise includes a checklist you can work from in order to confirm you have all (or at least most) of the elements that make up a good first act. If you're skeptical of the list, pull out your favorite novel and see how it's first act stacks up. 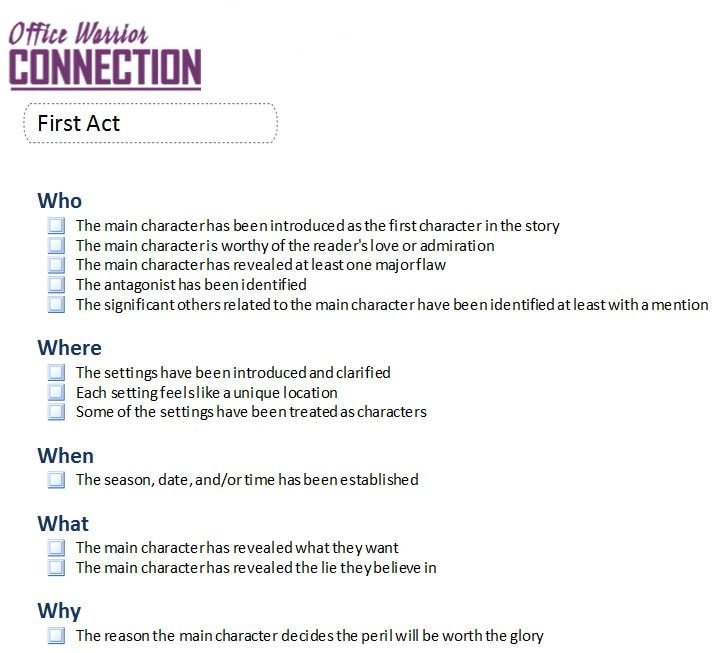 Exercise: First Act Checklist
Many of the items in the First Act checklist will have already been tackled by previous exercises, so this is an opportunity to review and make sure you haven't missed anything.
First Act Elements List Who
DOWNLOAD: First Act Checklist Worksheet Template Instructions Return to the Table of Contents Go to Day 22 - First Chapter |
 RSS Feed
