
|
8/29/2019 0 Comments Where to Get Started with an Office 365 Roll-out as an Application Trainer or IT Support Team Member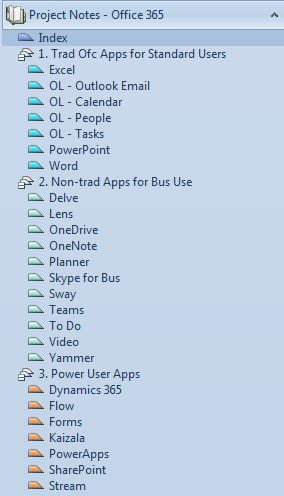 Wrapping My Head Around the Word “Platform”
My company is a bit late to the game when it comes to Office 365. It has its reasons. It’s an older company in terms of how long companies have been around in my state capitol and older companies often operate under the auspices of “If it isn’t broken, don’t fix it.” Over the years, technology eventually forced itself into every aspect of the company’s business, beginning with typewriters being replaced with word processors, and then later, computers. Secretarial staff adapted and learned the new tools, and the company blended the old philosophy with a new one: “We should be at the cutting edge, but not on the bleeding edge.” Infrastructure and updates were rolled out slowly on a 5 year replacement schedule, then a 3 year schedule, and then along came service apps, and now here we are today facing down Office 365 and Windows 10. Like I said, we are a bit late to the game, the year being almost 2020. My company’s small IT department has trudged through the last twenty years replacing and patching hardware and software as needed, playing a waiting game to keep costs down, coasting along on the old technology; knowing the new was coming, but taking few steps to investigate it. Here’s the thing. Microsoft has been synonymous in many of our minds as “software suites.” That is, Microsoft Office was Word, Excel, and PowerPoint. If you were a power user you might throw in Access, Project, and/or Visio. But Microsoft is a platform now, not a suite, and IT Support staff from companies like mine are going to need to wrap their heads around all the ways the apps are now hosted from the cloud with tighter integrations and more interdependent relationships. Yes, the primary office production apps can still be used as stand-alone apps, but the richness of a platform is lost in that environment. The ability to collaborate with coworkers, which is something the millennials seem to have an innate grasp of, with require the implementation of the full platform and apps that extend the capabilities of the software we’ve been used to. If you are one of the many IT Pros who have worked for a company that’s suddenly faced with preparing for the Office 365 migration, you’re going to be looking for some first steps and ways to get started. I know I was. Project Preparation I started digging into the wealth of information eight weeks ago, and the more I started learning, the more I discovered I had only scratched the tip of the proverbial iceberg. Each time I explored one area of the platform, I was led down a rabbit hole of three or six or twelve other areas. For instance, I found I couldn’t just learn how to add a new user to Azure Active Directory, I also needed to be able to understand how security works. And adding a new group in Groups does some things on the back-end like creating connections in OneDrive and OneNote. In fact, it’s been almost impossible to focus on a single area of Office 365 at any one point because the platform overlaps in so many areas. My notes were becoming a jumbled mess. When I wanted to share information with coworkers, I was spending too much time looking for it. I finally took an hour out of my day to get myself organized. It didn’t take too long because I was already dumping bits of info into pages in a Microsoft OneNote notebook. The bits were all related to content about apps, installation, security, training (for me as a Software Trainer and for material for what I’d need to convey to end users), and roll-out. In my role, my responsibilities overlap in every area of the platform. I had collected a lot of notes in two months. Now I needed some organization. With application training topmost in mind, I started by creating sections by classification. I created three classifications. The first section is applications that my end users are already traditionally using in their business space. It includes the standard Microsoft Office applications like Word, Excel, OneNote, Outlook, and PowerPoint. The second section is for the new tools I think my end users may be interested in. They are the “extras” which they haven’t been using yet like Delve, Lens, OneDrive, Planner, Sway, and Yammer. The third section includes applications that I see primarily being used by my power users, developers, and back-end software administrators. The Power User Apps section includes Azure, Flow, Kaizala, PowerApps, and SharePoint. At the top of the notebook, I created an index listing the names of the apps and then linked those back to each section in the notebook. This way, I always had a starting point to jump to whichever pages might be buried in a collapsed section of the notebook. Download A Copy of My Notebook I’m now about two weeks in with my improved organization and have added more sections for Installations, Troubleshooting, and Roll-out. If you are in my boat and looking for a place to start storing your notes, you can download a OneNote package of the file I started with and modify it to your hearts content! Good luck with your Microsoft Office suite to Office 365 platform transition! DOWNLOAD: Office 365 Project Notes template Template Instructions Find more templates: Table of Contents
0 Comments
What is a Story Arc? A story arc is the traditional arc that builds the structure of a story. You may also find it called a story curve or simply, the story structure. While genres will vary to some degree or another, almost all stories follow the curve to some extent and so it has become a wildly popular topic among those who teach creative writing. The traditional arc is broken up into five stages which are in turn often broken into smaller components. If you think about your favorite book or movie, it's likely that you will recognize each stage. The stages are: Exposition, Rising Action, Climax, Falling Action, Resolution. The Five Stages of the Story Arc The exposition is the beginning of the story leading up to the curve and it's where we get grounded in the story. It's when we carry our book as we're reading to the kitchen, make a cup of tea, and then go burrow into a blanket to snuggle in. (Or put the book away if we aren't hooked, but more about that later.) We learn who is the main character, where and when the story is taking place, and what the character wants. That "want" is going to be a powerful motivation to moving the story forward. The rising action is the where the story starts moving forward. It makes up the bulk of the story with conflicts and challenges and it can be broken down further into four distinct components. A [trigger] provides some sort of insight to the main character that what is wanted can be obtained despite any doubt or fears they have. The [quest] is how the character gets past those doubts to go after the wanted thing. But then, [surprise]! - there's something more that raises a true fear and understanding of what failure could cost. And finally, the character makes a [critical choice] and decides getting the wanted thing will be worth every risk. All of this rising action and turmoil (whether it's internal or external) is ramping up for a big battle in the end and that big battle is the climax. This is when we find out, usually along with the main character, what that character (and us as extensions of that character as the reader), needs. Not wants! -- Needs. Finally, we have resolution and a return to order or a normal world. We see the main character returning home and taking his place once more in the world, albeit, changed in some way. There's often some sort of celebration or recognition of the main character having gone after what was wanted and achieving what was ultimately needed. Other Resources Several authors and writing professionals have created story arcs for the different genres. Search the Internet for "story arc" and the genre of your manuscript to see if one has been made for your genre. These are meant to help you understand from the unique perspective of your genre what each of these components reflect. This may be more helpful that the short description I've provided above and give more guidance in completing the exercise below. When you do your search, you may run across beat sheets. "Beat sheets" are another way of presenting a story arc in a less graphical way. Beat sheets are often set up as spreadsheets that list the "beats" in one column, a description of the beat/component in the next, and calculations of page or word count where each beat should be falling. If you are trying to shoot for a specific word count, you usually can recalculate the beats based on the total word count. Some of the beat sheets are set up to do the calculation for you. If you can't find a story map specific for your genre, visit Ingrid Sundberg's blog and see her Archplot Story Structure download. It demonstrates each of the pot points in several different ways. https://ingridsnotes.wordpress.com/2013/06/05/what-is-arch-plot-and-classic-design/ Why Map a Completed Story to the Story Arc? Mapping your completed story to a story arc is one more step to rooting out plot holes and fixing them. It will also make sure you have all the elements of a story that a reader expects to find in a story and that all those elements are in the right places. 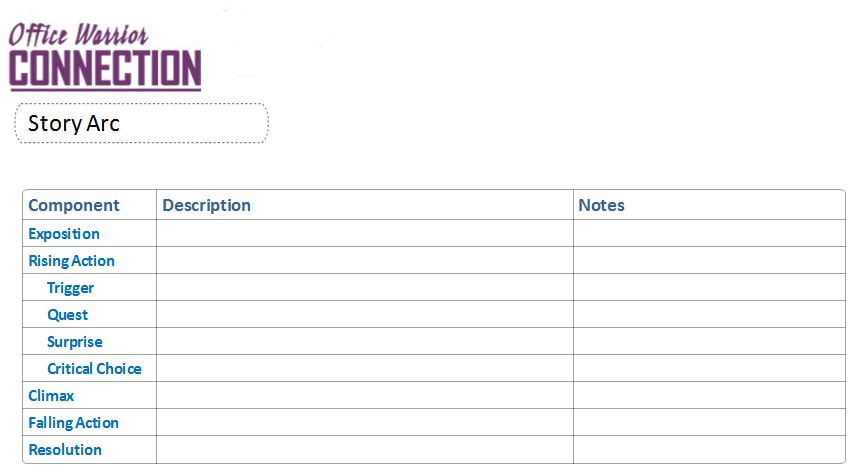 Exercise: Map Your Chapter Summary to the Story Arc
Before you get started creating your OneNote page, take your Chapter Summary outline from Day 5 and highlight all the items in your Chapter Outline that create tension and lead up to the climax. We can use this highlighted text for two exercises, including this one.
Considerations
DOWNLOAD: Story Arc Worksheet Template Instructions Tips for working by hand If you'd like to work on notepaper or set up your own table in your favorite application, include the columns listed above. The percentage listed is approximately the size you should make each column. If you are going to work by hand, give yourself plenty of space to complete the descriptions and notes for each component. Return to the Table of Contents Go to Day 10 - Strategies for Editing From Your Worksheets 5/3/2019 Day 8 - Find Your FlowOrganize Your Workspace Week one of editing is in the books! Well done! Of course, now we get down to the challenge. Editing is a lot like completing a puzzle. Sometimes the pieces don't fit even though they look like they should. Sometimes all the pieces come together with hardly any work at all. And sometimes we have to spin some stuff around until it fits into place. Sometimes we lose a piece under the table. It's always fun when you get a piece from another box too, right? You may have started one worksheet each day, or you may have created all your worksheets in one day and are now ready to spend the next six days reading and annotating. You may be thinking to yourself, "This is a lot of worksheets." You're right. It is. I recommend you give yourself plenty of space to work. If you are working on hand-written outlines, find a place where you can spread out. You will be picking up and setting aside the various pages. A lot. If you are working strictly on your computer, and have dual monitors, you might try using Cascading Windows. To cascade your windows, follow these steps:
If you are working on your computer, a table device, or your phone, things will be a little more challenging for you as you swap in and out of outlines. In this case, think about printing a copy of your book if possible so you can read through the paper copy while working the outlines on the computer. Find Your Flow Once you've gotten the workspace under control, the next step is to find a rhythm to Read-Notate-Summarize-Repeat. When I first start my big picture edits, I like to start with my Setting and Character Analysis worksheets on top, and the reason is because the first handful of chapters are when you introduce characters and build their world. Somewhere about a quarter of the way through, you will find you are reaching for those worksheets less and by the time you are half-way through, you may not be reaching for them at all because your characters will be on pretty solid footing. You will only need those worksheets for major shifts or reveals...those ah-ha moments when readers think, "Oh, that's why she did that." Try to read through the chapter without stopping to edit as much as possible. Only pause when you have read a character or setting attribute. Stop mid-scene to notate items that are details about characters or setting. After you have finished reading through the chapter, then complete the Chapter Summary, Timeline, and Conflict worksheets while the chapter is still fresh in your mind. If you can't remember something, flip back and reread. If your chapters tend toward the long side, you can break your chapters down into scenes. Use a Highlighter Use a highlighter judiciously. Whether you are working in a paper copy of your book or with an electronic version, the highlighter will be your friend when you are trying to get through massive amounts of text in a relatively short period of time. If something doesn't read right, don't fix it - highlight it. If you have a specific note you need to make so you don't forget why you highlighted it, use Comments or make a note on one of the outlining worksheets. It doesn't matter if the worksheet isn't expressly made for whatever notation you are making. The point is to capture everything you think you need to fix but stay in your groove. Okay! Let's get reading and annotating! DOWNLOAD: Instructions for Analysis of Outlines Template Instructions Return to the Table of Contents Go to Day 9 - Map Your Chapter Summary to a Story Arc  5/3/2019 Day 7 - Outlining - Chapter ConflictChapter Conflict Without conflict, the character has nothing to drive them forward and the reader won't care about the character. If the reader doesn't care about the character, they don’t care about the book. Readers who don't care about the book won't leave a review, or worse, they will leave a negative review. So let's crank up the conflict in our stories and get those readers feeling bad for our characters! Conflict comes in many flavors, though generally when conflict is discussed in relation to the plot, it is speaking about the main character being up against something else. The something else can be another character, the character's self, nature, society, or something unnatural like fictional beasts, an omnipotent being, or technology. It is these conflicts that engage the character and by extension of that, engage the reader, so it is in the writer's best interest to make sure conflict is handled well in a story. Since variety is the spice of life, the conflict in our stories should be from all different sources and occur on different levels. Consider the difference between a slight disagreement to a full-out fistfight, or a dash through the rain compared to being stuck in a basement as a tornado sweeps through town. Remember too that all of our characters will handle stress, whether slight or severe in different ways, so where our main character might brush off a slight disagreement with their significant other, a disagreement with a coworker might be handled in a very different way. Finally, it's good to keep in mind that all these "little" confrontations will weigh on our characters in the same way they weigh on us. A couple of little things or even one big thing might be handled just fine, but if more and more start heaping on, we eventually reach a breaking point. The breaking point usually results in an emotional outburst of some sort (depending on the character), but the type of outburst can vary, again, depending on the character and the character's personality. Today's exercise will be about discovering all the points of conflict in our story, whether it is minor or major and indexing it so we can determine if we've heaped enough on our characters to reach the breaking point and get an emotional response from the reader. 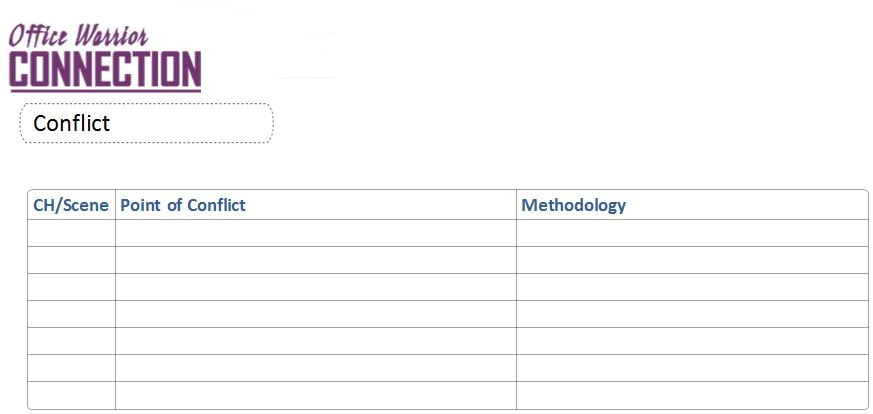 Today's Task
Days 3 - 7 are activities you can do in tandem with each other. Focus on understanding the steps you need to complete for today's outlining by working through Chapter One. As with the other outlines, today's process should be about creating today's worksheet and understanding how to use it rather than reading through the whole story and completing the outline as a single task. This is because you can read through each chapter and complete the various outlines all together and save yourself some time rather than reading through your story three or four times in a row. Remember, this is a fact-finding mission. You are analyzing what you actually wrote, not remembering off the top of your head what you intended to write. Exercise: Create a Conflict Worksheet If you are creating your notes in your OneNote Novel Editing notebook, follow these steps to complete the exercise:
Chapter Summary Parameters Chapter/Scene - Write in the chapter number or a short description of the chapter and scene. For shorthand notation, use C1S1 to represent Chapter 1 Scene 1. Point of Conflict - Provide a concise description of every conflict the main character runs into throughout your story. Every bit of aggravation should be listed, whether it's a thunderstorm, a bully, a burnt dinner, self-doubts, or a computer crash. If it gets in the way of the character's path to getting what they want, write it down. Methodology - Explain how the tension builds conflict for the character. Analysis of Conflict Once you have indexed all your points of conflict, you can analyze the stressors to see if you need to make any modifications. Review your list and ask yourself the following questions.
If you are working on Days 3 - 7 in conjunction with one another, you may have done enough today by creating your worksheets and reading chapter 1 five times in a row to get a good understanding of how you will be completing each worksheet to dig out the big plot holes. Try chapter 2 to make sure it all clicks if you need to. Day 8 will be how to find a flow to reading all the material of your novel and completing the worksheets all at once. It will give you a little more guidance on how to manage all the outlines while you read all your chapters. If you have time to begin reading more chapters after creating your Day 3 -7 outlines, go on and read Day 8. If creating your worksheets and working through Chapter 1 is all the time you have available for today, then read Day 8 when you are ready to get down to business. DOWNLOAD: Chapter Conflict Worksheet Template Instructions Tips for working by hand If you'd like to work on notepaper or set up your own table in your favorite application, include the columns listed above. The percentage listed is approximately the size you should make each column. If you are going to work by hand, don't draw the rows in until you start working and then add the rows as you complete each chapter. Next Steps If you've finished creating all the Outlining worksheets and have completed each of them for Chapter One of your book, you are ready to start the tedious process of reading and annotating. Read Day 7 for tips on preparing your workspace and using all the Outlining worksheets. Return to the Table of Contents Go to Day 8 - Find Your Flow 5/3/2019 Day 6 - Outlining - TimelineWhat are Timelines? A Timeline is a picture of how things occur within the space of time. Since we don't always write linearly, especially when we are blending in backstory throughout a novel, creating a timeline can give us a perspective of all the events as if they were linear. Creating a timeline after your write your book will make you focus on the arc of the story itself. Once you've completed it, you can compare it to a story arc (also known as the Hero's Journey) to see if you are hitting all the turning points at the right time. Since our characters are often affected by events in their past, you may find you actually need to create two timelines, one for current events and another for backstory. 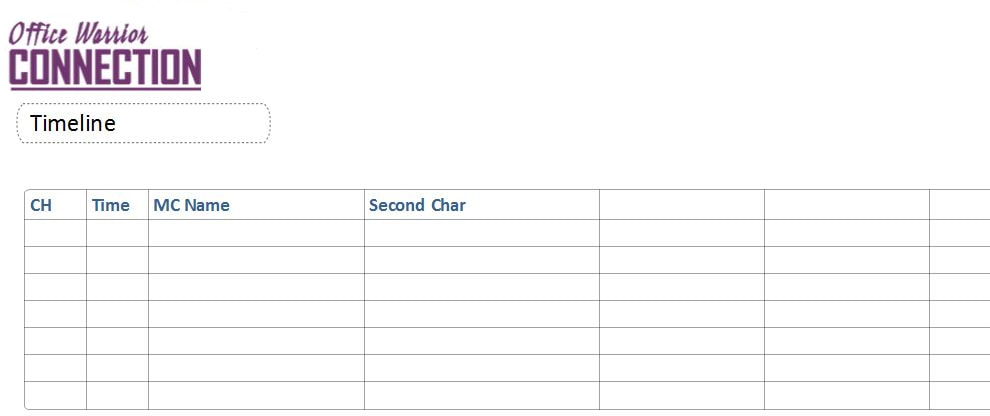 Today's Task
Days 3 - 7 are activities you can do in tandem with each other. Focus on understanding the steps you need to complete for today's outlining by working through Chapter One. If you have time after reading through your first chapter, go to Day 7 and begin that exercise. As with the other outlines, today's process should be about creating today's worksheet and understanding how to use it rather than reading through the whole story and completing the outline as a single task. This is because you can read through each chapter and complete the various outlines all together and save yourself some time rather than reading through your story three or four times in a row. Remember, this is a fact-finding mission. You are analyzing what you actually wrote, not remembering off the top of your head what you intended to write. Exercise: Complete the Timeline Worksheet If you are creating your notes in your OneNote Novel Editing notebook, follow these steps to complete the exercise:
Timeline Parameters Chapter - Write in the chapter number or a short description of the chapter. If you have very long chapters, you may wish to use scenes instead. Time - Add the time of day, day of the week, date, or whatever reference for time that is appropriate for the first scene in the chapter. As you work through your chapters, you will add the different time frames and events that occur. In the rest of the columns, which represent each of the characters in your story (including the antagonist), you will be adding descriptions of the action or events occurring. The idea is to make sure no character is out of place at any one point in time. A character cannot be in two places at the same time (unless you are writing some sort of science fiction and the space time continuum has been bent). You also need to make sure you have given your characters time to move from one place to another during scene changes. For characters who are not in the scenes, think about where they might be in the world of your story. They must be somewhere even if they aren't in the scene. Use a different font or pen color for scenes you have typed into your story versus off-scene characters. You will want to make sure those characters aren't in two places at once and have time to move around in your story's world as well. If you find mistakes or have questions about whether or not you've put your characters somewhere where they can't possibly be in some moment of time, make a note in the character's column. Remember! You aren't editing right now. You are reading your chapters to pick them apart. Make notes for what you need to edit later. Only read through Chapter 1 for now, then if you still have time, go on to Day 7 and start that worksheet. If you are able to create worksheets for Days 3 -7 in one sitting, that's great! It will allow you to read the rest of your chapters over the course of multiple days. If you are pinched for time, that's okay too. Do what you can and don't stress over what a long process editing can be. Try to give yourself a dedicated block of time just like you would do for writing and get done whatever you can. DOWNLOAD: Timeline Worksheet Template Instructions Tips for working by hand If you'd like to work on notepaper or set up your own table in your favorite application, include the columns listed above. The percentage listed is approximately the size you should make each column. If you are going to work by hand, include as many columns as you need. Other than the Time column which can represent day or hour, you will create a column for each important character in your story. That might mean 2 columns, 6 columns, 20 columns or more. You might need to use two or three sheets of paper wide and tape them together. Don't draw the rows in until you start working and then add the rows as you complete each chapter. Return to the Table of Contents Go to Day 7 - Outlining (Part 5 - Chapter Conflict) 5/3/2019 Day 5 - Outlining - Chapter SummaryWhy Do a Chapter Summary? One of the first things you should do after writing a novel is read for plot holes. This can be really hard as editors of our own work because our mind fills in holes for us. Outlining your novel with a chapter summary after you have written it will help you find plot holes, character discrepancies and setting disparity. Even if you plotted before you wrote the story, you should take the time to outline what you actually wrote, which could be wildly different than what you had in mind, especially if you wrote much of your manuscript during sprints. A Chapter Summary is a brief description of each chapter. As you read and focus on just one chapter at a time, you might be able to see where you missed important details. You can also make sure you understand the purpose of each chapter. Sometimes when we are sprinting, or even when we are taking our time and writing with intent, we add information that doesn't lead the story forward. Doing a chapter outline is a good chance to examine each chapter to determine, "Is it necessary?" 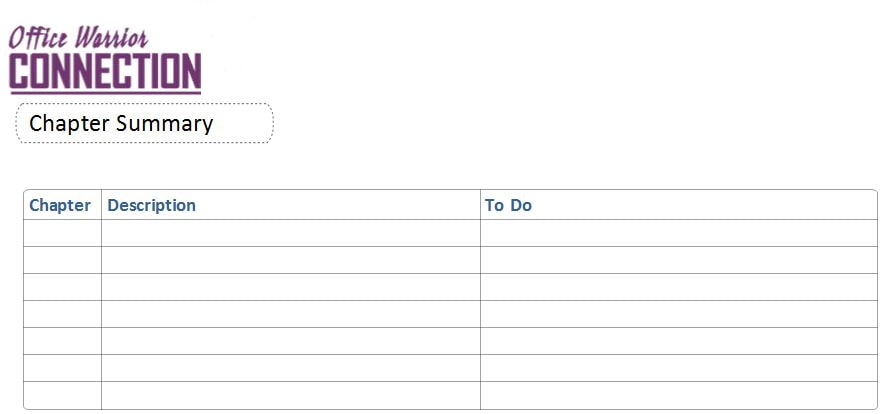 Today's Task
Days 3 - 7 are activities you can do in tandem with each other. Focus on understanding the steps you need to complete for today's outlining by working through Chapter One. If you have time after reading through your first chapter, go to Day 6 and begin that exercise. As with the other outlines, today's process should be about creating today's worksheet and understanding how to use it rather than reading through the whole story and completing the outline as a single task. This is because you can read through each chapter and complete the various outlines all together and save yourself some time rather than reading through your story three or four times in a row. Remember, this is a fact-finding mission. You are analyzing what you actually wrote, not remembering off the top of your head what you intended to write. Exercise: Complete the Chapter Summary Worksheet If you are creating your notes in your OneNote Novel Editing notebook, follow these steps to complete the exercise:
Chapter Summary Parameters Chapter - Put the chapter number or a very short description. If you have very long chapters, you may wish to use scenes instead. Description - Condense the chapter into a few sentences. Included in your notes should be a mention of purpose. Define why the chapter is important or how it leads the story forward. When you think about whether or not the content of the chapter moves the story forward determine whether or not you could remove it completely. If the story would still be fundamentally solid without a scene, make a note in the To Do column to consider removing it. Don’t delete it! Move it to a different location in case you can use the content in another scene or even a different story. To Do - Note what you find that needs fixing. Include items that you can see you need to strengthen or anything that doesn’t make sense or that just “feels” wrong. Look for cause and effect within the chapter. Lack of cause and effect is the equivalent of lack of tension which can present itself as “An action did not cause a reaction.” Try not to focus too much on fixing the issues right while you are in the middle of your fact-finding mission. Instead, work your way through your full story and make detailed notes about any corrections you want to make. Only read through Chapter 1 for now, then if you still have time, go on to Day 6 and start that worksheet. If you are able to create worksheets for Days 3 -7 in one sitting, that's great! It will allow you to read the rest of your chapters over the course of multiple days. If you are pinched for time, that's okay too. Do what you can and don't stress over what a long process editing can be. Try to give yourself a dedicated block of time just like you would do for writing and get done whatever you can. As a final note, hang onto your chapter summary. If you decide to query agents for publication, some of them may ask you for a story synopsis. Your chapter summary will be a valuable tool in writing your synopsis. DOWNLOAD: Chapter Summary Worksheet Template Instructions Tips for working by hand If you'd like to work on notepaper or set up your own table in your favorite application, include the columns listed above. The percentage listed is approximately the size you should make each column. If you are going to work by hand, don't draw the rows in until you start working and then add the rows as you complete each chapter. Return to the Table of Contents Go to Day 6 - Outlining (part 4 - Timeline) Setting Characteristics A well developed setting can set a mood or effect the behavior of the other characters in your story. Setting is a large part of world building. Just think about Star Wars or Harry Potter. Their settings are developed in a way that cause the characters of the stories to behave in certain ways and enhance the theme of the scene. In the case of Star Wars, if I say "the ice planet of Hoth" or "the cantina on Mos Eisley,"any fan will immediately envision the scenes that occurred in those settings. A Setting Characteristics outline will confirm that you have specified a locale, time of year, and time of day. Depending on your story, it may be important to capture climate, geography, or the socioeconomic and cultural aspects of the environment. Your setting can also be used as a foil to expressing the passage of time. A change in season, for instance, can mark the passing of several months rather than saying, "Four months later..." 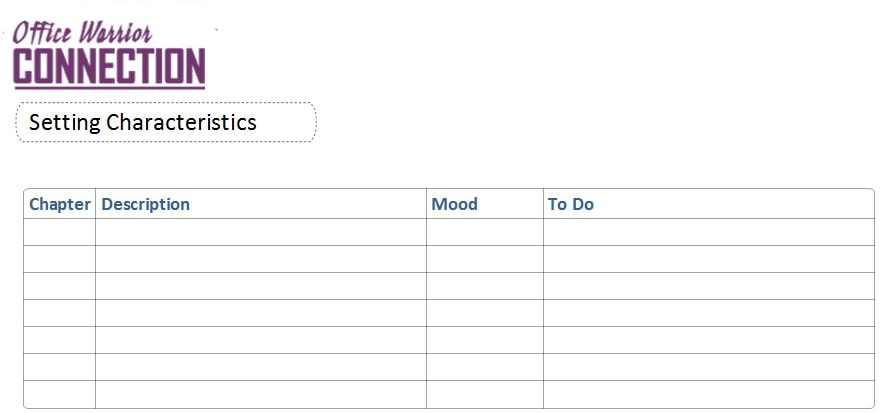 Today's Task
Days 3 - 7 are activities you can do in tandem with each other. Focus on understanding the steps you need to complete for today's outlining by working through Chapter One. If you have time after reading through your first chapter, go to Day 5 and begin that exercise. As with the other outlines, today's process should be about creating today's worksheet and understanding how to use it rather than reading through the whole story and completing the outline as a single task. This is because you can read through each chapter and complete the various outlines all together and save yourself some time rather than reading through your story three or four times in a row. Remember, this is a fact-finding mission. You are analyzing what you actually wrote, not remembering off the top of your head what you intended to write. Exercise: Complete the Setting Characteristics Worksheet If you are creating your notes in your OneNote Novel Editing notebook, follow these steps to complete the exercise:
Setting Characteristic Parameters Chapter - Write in the chapter number or a short description of the chapter. If you have long chapters, you may wish to break this down further into scenes. Description - Make notes about the setting as you have described it. Keep an eye out for anything that suggests weather, time of day, or season. Mood - Write down a word or short phrase that captures the essence of the mood of the chapter based on the descriptions of the setting supplied by the words and phrases of each chapter or scene. Do not do this from memory. To Do - Make notes about anywhere the setting didn’t capture the mood you intended, or if you think you could strengthen the mode by providing a better description. Also, if you wrote about the setting but it didn't have a cause and effect element between setting and characters, ask yourself if you need the text. If you don't, make a note to delete it later. You may find you have chapters where setting is not mentioned at all. Note those chapters on your outline in case you decide later you can strengthen your story by adding something. Only read through Chapter 1 for now, then if you still have time, go on to Day 5 and start that worksheet. If you are able to create worksheets for Days 3 -7 in one sitting, that's great! It will allow you to read the rest of your chapters over the course of multiple days. If you are pinched for time, that's okay too. Do what you can and don't stress over what a long process editing can be. Try to give yourself a dedicated block of time just like you would do for writing and get done whatever you can. DOWNLOAD: Setting Characteristics Worksheet Template Instructions Tips for working by hand If you'd like to work on notepaper or set up your own table in your favorite application, include the columns listed above. The percentage listed is approximately the size you should make each column. If you are going to work by hand, don't draw the rows in until you start working and then add the row designations as you complete each chapter. Return to the Table of Contents Go to Day 5 - Outlining (Part 3 - Chapter Summary) What are Character Attributes? Character attributes are everything you (or the reader) can use to describe a character. Consider how many words it would take if you had to sit down and describe every attribute that makes you a person separate and different than any other person. Start with how you look to others. Physical attributes include the color of your hair, eyes, and skin, whether you walk with a limp, the fact that you get hiccups after you drink Vernors (Michigan gal here, I think the rest of you call it Ginger Ale), or how you have the cutest little heart scar that you got when you fell off your bike while you were learning to ride it and your mother told you later you had been kissed by the earth. Our outward appearances alone could fill a book. Beyond physical descriptions, we all have biases, philosophies, religious belief systems, traumas, motivations, likes and dislikes, hopes and fears, and more. Our non-physical traits could probably fill a tome. Some of our traits will guide who we are and some will guide how we act in the world or react to events and stressors in the world we walk in. As authors, our goal should be to create characters who feel as real as we do. They should be made up the traits which show they aren't one hundred percent perfect and good or one hundred percent imperfect and bad, and it's our responsibility as writers and editors to make our characters believable. What is a Character Profile? A character profile is often done by writers either before or during the plotting of a novel. Getting to know characters on a level deeper than the surface (such as their eye or hair color), helps determine behaviors throughout the story and makes the characters more believable. A character profile will include physical traits, but it may also include motivations, philosophies, likes and dislikes, back story, and more. The profile will also help determine a character's negative traits or flaws instead of just the character's positive attributes. Flaws make a character feel more real and relatable. If you are interested in learning more about completing character profiles, I recommend Writer's Write or Reedsy because they have really good profiling information and outlines. I also have a OneNote section that I use for character profiling which I built by compiling information from many different sources. You can download my section template. 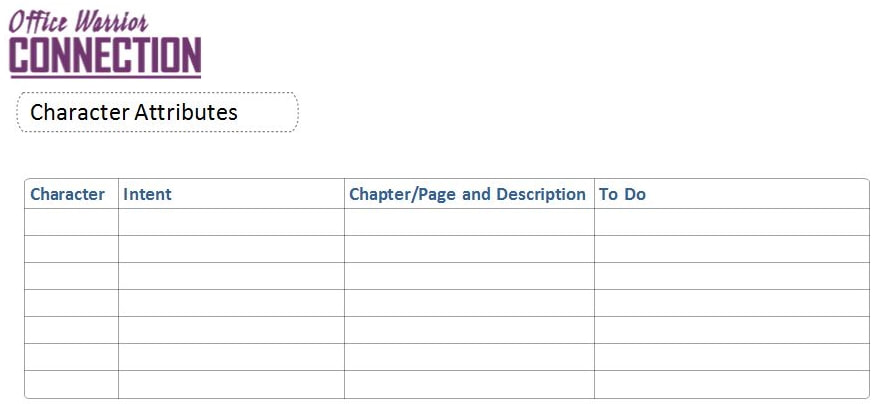 Today's Task
A character attributes outline will make sure you've constructed a character with depth, as well as stayed consistent in not only physical characteristics, but also in personality, style and psyche. This is the flip-side, post-writing, of a character profile that you may have done while plotting. If you did character profiles before you wrote your story, it's nice to be able to compare what you intended to portray with how your characters actually turned out. You may find that you plotted a character with brown eyes for some very good reason, but then wrote in the story that the character had blue eyes. That inconsistency may need to be fixed, or you may have come up with a better reason mid-story why the character needed those blue eyes after all. A reference to the character's brown eyes later in the story would then need to be addressed instead. Days 3 - 7 are activities you can do in tandem with each other. Focus on understanding the steps you need to complete for today's outlining by working through Chapter One. If you have time after reading through your first chapter, go to Day 4 and begin that exercise. As with the other outlines, today's process should be about creating today's worksheet and understanding how to use it rather than reading through the whole story and completing the outline as a single task. This is because you can read through each chapter and complete the various outlines all together and save yourself some time rather than reading through your story three or four times in a row. Exercise: Complete the Character Attributes Worksheet If you are creating your notes in your OneNote Novel Editing notebook, follow these steps to complete the exercise:
Character Attribute Parameters Character - Write in the character's name or, if un-named, a short description. You can do this portion of the exercise from memory. You do not need to list very minor characters unless they come in and out of scenes in multiple places in the story. Intent - You can do this column from memory. Provide a concise description of how you intended your character to be perceived by other characters in the book and by the reader. If you did character profiles before you wrote your story, you may be able to gather some basic information from your profiles to complete this column. An example of what you might write in this column would be, "Evan is a teen conspiracy theorist with flaming red hair who talks too much." Chapter/Page and Description - This portion of the exercise is the fact-finding portion. Do not work from memory for this column. You are analyzing what you actually wrote about your characters. Consider including sections for each type of attribute. For instance, you might include headings such as one for physical description where you document eye color, hair color, and skin tone; another section for personality characteristics like quirks, life philosophy, etc. Remember, you are tracking these traits to ensure you have been consistent from chapter one and all the way through until you typed The End. To Do - Once you have completed the outline for all the chapters, compare the information you collected with your character intentions. You should be looking very closely for evidence that either supports or refutes what you intended your characters to be like. In the To Do column, make a note of any inconsistencies that you find OR any behaviors that are not consistent with the traits you've given your characters. For instance, would a shy character walk into a party wearing neon pink? Maybe, but if that is completely inconsistent with how you envision your character, it might be a note you make in order to correct the scene. Again, try not to make all the corrections as you read through the chapters. Focus on getting the traits down on paper and looking for inconsistencies where a character's trait doesn't mesh with their behavior. If you start making changes before you have finished reading through all your chapters, you may find you are doubling or even tripling your work because you may change something that you realize later you need to revert back or even change yet again. Only read through Chapter 1 for now, then if you still have time, go on to Day 4 and start that worksheet. If you are able to create worksheets for Days 3 -7 in one sitting, that's great! It will allow you to read the rest of your chapters over the course of multiple days. If you are pinched for time, that's okay too. Do what you can and don't stress over what a long process editing can be. Try to give yourself a dedicated block of time just like you would do for writing and get done whatever you can. DOWNLOAD: Character Attributes Worksheet Template Instructions Tips for working by hand If you'd like to work on notepaper or set up your own table in your favorite application, include the columns listed above for each table. The percentage listed is approximately the size you should make each column. If you are going to work by hand, on the second table be sure to give your main character their own page and important secondary characters a half or third of a sheet. Your minor characters may only need a couple lines each. You have a better idea of how much detail your characters were intended to have, so plan your space accordingly. Return to the Table of Contents Go to Day 4 - Outlining (Part 2 - Setting Characteristics) |
 RSS Feed
