
|
5/3/2019 Day 6 - Outlining - TimelineWhat are Timelines? A Timeline is a picture of how things occur within the space of time. Since we don't always write linearly, especially when we are blending in backstory throughout a novel, creating a timeline can give us a perspective of all the events as if they were linear. Creating a timeline after your write your book will make you focus on the arc of the story itself. Once you've completed it, you can compare it to a story arc (also known as the Hero's Journey) to see if you are hitting all the turning points at the right time. Since our characters are often affected by events in their past, you may find you actually need to create two timelines, one for current events and another for backstory. 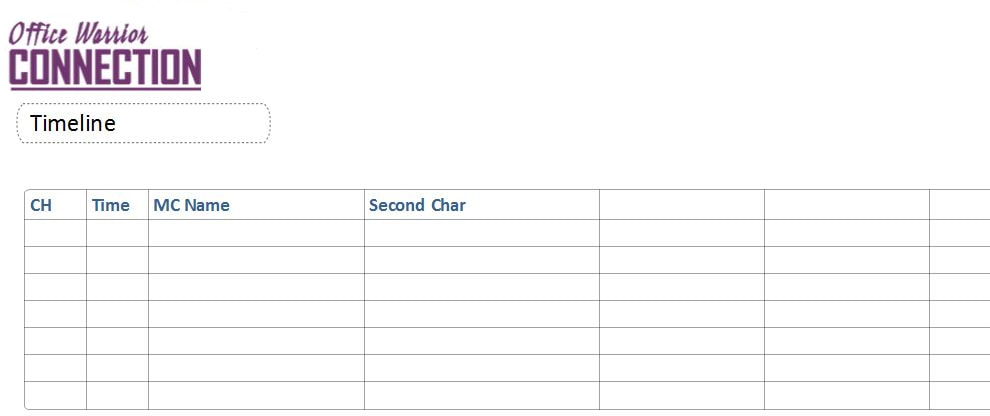 Today's Task
Days 3 - 7 are activities you can do in tandem with each other. Focus on understanding the steps you need to complete for today's outlining by working through Chapter One. If you have time after reading through your first chapter, go to Day 7 and begin that exercise. As with the other outlines, today's process should be about creating today's worksheet and understanding how to use it rather than reading through the whole story and completing the outline as a single task. This is because you can read through each chapter and complete the various outlines all together and save yourself some time rather than reading through your story three or four times in a row. Remember, this is a fact-finding mission. You are analyzing what you actually wrote, not remembering off the top of your head what you intended to write. Exercise: Complete the Timeline Worksheet If you are creating your notes in your OneNote Novel Editing notebook, follow these steps to complete the exercise:
Timeline Parameters Chapter - Write in the chapter number or a short description of the chapter. If you have very long chapters, you may wish to use scenes instead. Time - Add the time of day, day of the week, date, or whatever reference for time that is appropriate for the first scene in the chapter. As you work through your chapters, you will add the different time frames and events that occur. In the rest of the columns, which represent each of the characters in your story (including the antagonist), you will be adding descriptions of the action or events occurring. The idea is to make sure no character is out of place at any one point in time. A character cannot be in two places at the same time (unless you are writing some sort of science fiction and the space time continuum has been bent). You also need to make sure you have given your characters time to move from one place to another during scene changes. For characters who are not in the scenes, think about where they might be in the world of your story. They must be somewhere even if they aren't in the scene. Use a different font or pen color for scenes you have typed into your story versus off-scene characters. You will want to make sure those characters aren't in two places at once and have time to move around in your story's world as well. If you find mistakes or have questions about whether or not you've put your characters somewhere where they can't possibly be in some moment of time, make a note in the character's column. Remember! You aren't editing right now. You are reading your chapters to pick them apart. Make notes for what you need to edit later. Only read through Chapter 1 for now, then if you still have time, go on to Day 7 and start that worksheet. If you are able to create worksheets for Days 3 -7 in one sitting, that's great! It will allow you to read the rest of your chapters over the course of multiple days. If you are pinched for time, that's okay too. Do what you can and don't stress over what a long process editing can be. Try to give yourself a dedicated block of time just like you would do for writing and get done whatever you can. DOWNLOAD: Timeline Worksheet Template Instructions Tips for working by hand If you'd like to work on notepaper or set up your own table in your favorite application, include the columns listed above. The percentage listed is approximately the size you should make each column. If you are going to work by hand, include as many columns as you need. Other than the Time column which can represent day or hour, you will create a column for each important character in your story. That might mean 2 columns, 6 columns, 20 columns or more. You might need to use two or three sheets of paper wide and tape them together. Don't draw the rows in until you start working and then add the rows as you complete each chapter. Return to the Table of Contents Go to Day 7 - Outlining (Part 5 - Chapter Conflict) Comments are closed.
|
 RSS Feed
