
 Welcome to Day 1! The first step in the OneNote Novel Editing Plan is to set up your notebook for storing all your editing notes. If you aren't familiar with Microsoft OneNote, you can take a couple minutes to review the basic instructions I provided on the Office Warrior Connection page. Instructions are written for Microsoft OneNote 2016, but if you have an older version of the software, you will probably find the instructions haven't changed much. If you still have OneNote 2010 or older, consider upgrading OneNote even if you don’t upgrade the rest of Microsoft Office. Microsoft OneNote is a free application and it is a stand-alone version that does not require you to upgrade the rest of your Microsoft Office Suite. By upgrading, you will have new features not including in those older versions. One of my favorite new features is the ability to sort Tables. (Also note, you have until October 13, 2020, before Microsoft Office reaches the end of it's support cycle.) Step 1 - Set up your new notebook Step-by-Step Instructions to create a notebook As mentioned in the Introduction [link], you don't have to set up an electronic notebook to follow along and edit your novel, but if you are the kind of person who likes to work at all hours of the day and night, you might like having the access to your notebook on all your devices. In order to have this sort of accessibility, be sure to save your notebook to your Microsoft account. Consider naming your notebook with the title of your book and the words "Editing Notebook." If my story was called "Argent Glass," I would name my notebook "Argent Glass Editing Notebook." Better yet, create two notebooks. One for your current work in progress, and one to reuse as a template for your next novel. TIP! If you set up two notebooks and are downloading the templates rather than creating them on your own, you can drag and drop a page to one section in one notebook, then drag and drop while holding your Control key to make a duplicate in another section of a different notebook. Step 2 - Set up some Sections Step-by-Step Instructions to create Sections Once you have your editing notebook created, set up some sections. You can create the pages as you go, but it will be nice to have the sections in place for all the pages you will be creating throughout the rest of the month. These are the sections I recommend you create:
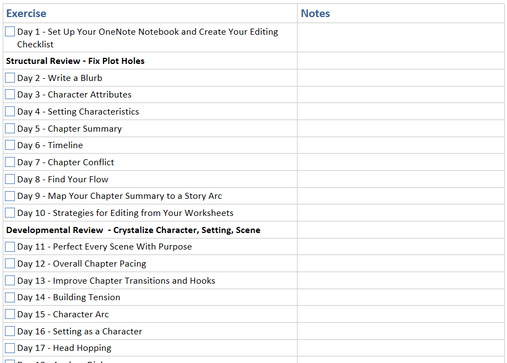
Step 3 - Create a To Do List The to-do list below lists all the exercises I have set up for the complete OneNote Novel Editing Plan. You can use the list as a checklist or you can combine the list with a table and make is a task list with a column for notes about what you need to do to complete the exercise and checkboxes to mark items complete.
DOWNLOAD: To Do List Template Instructions How to Use the To Do list In the notes field, you can keep track of the time you spent editing or make notes about what you need to do to finish the exercise. That way, if you get part-way done and need to move on to something else for some reason or need to come back at a later date to finish, you know where you left off. You could even add a hyperlink back to the webpage with the instructions or the links to the other resources in case you need to do more research about completing the task. The check boxes are "checkable." That means you can click on them to put a check mark in the box. If you click on them again, the check will disappear. Since you've now created the checklist, you can click that box and mark that item complete. Return to the Table of Contents Go to Day 2 - Write a Blurb
0 Comments
Your comment will be posted after it is approved.
Leave a Reply. |
 RSS Feed
